In this lesson, we’ll take a look at EtherChannel, which is also known as link aggregation. EtherChannel is a technology that lets you bundle multiple physical links into a single logical link. We”ll take a look at how it works and what the advantages of EtherChannel are. Let’s start with an example of a small network:

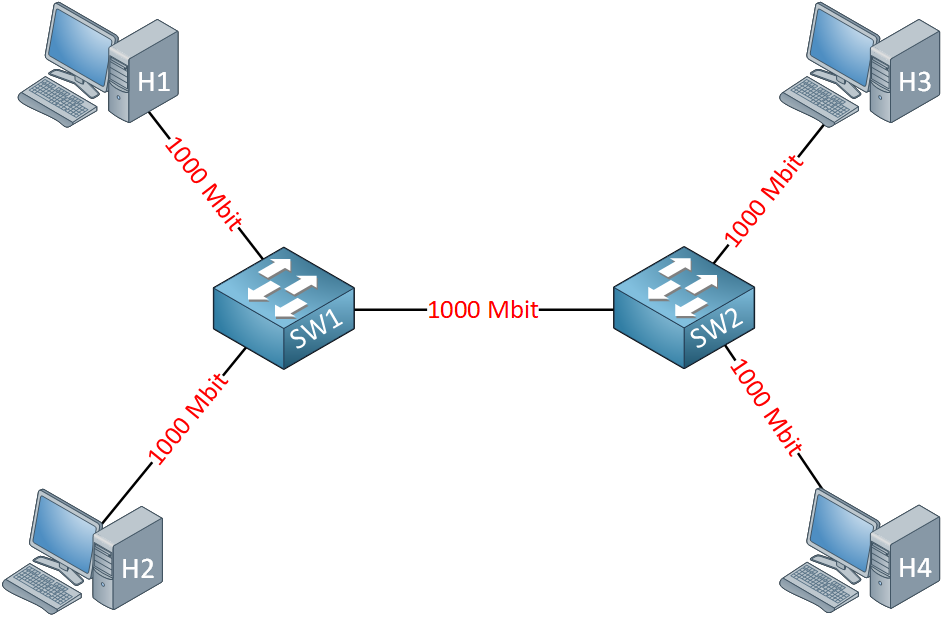
Take a look at the picture above. I have two switches and two computers connected to each switch. We use Gigabit Ethernet interfaces everywhere.
Now imagine that H1 sends 800 Mbit of traffic destined for H3 and H2 sends 600 Mbit of traffic destined for H4. The link between the switches will be a bottleneck. We require 800 + 600 = 1400 Mbit, but we only have a 1000 Mbit link.
There are two solutions to this problem:
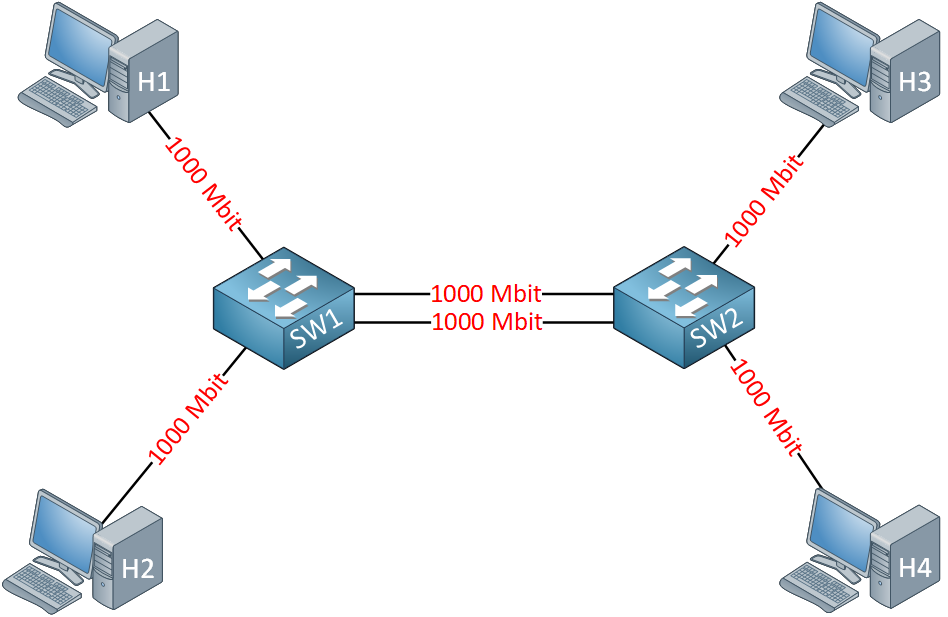
Since this lesson is about EtherChannel, we’ll take a look at adding multiple links. Here’s an example:

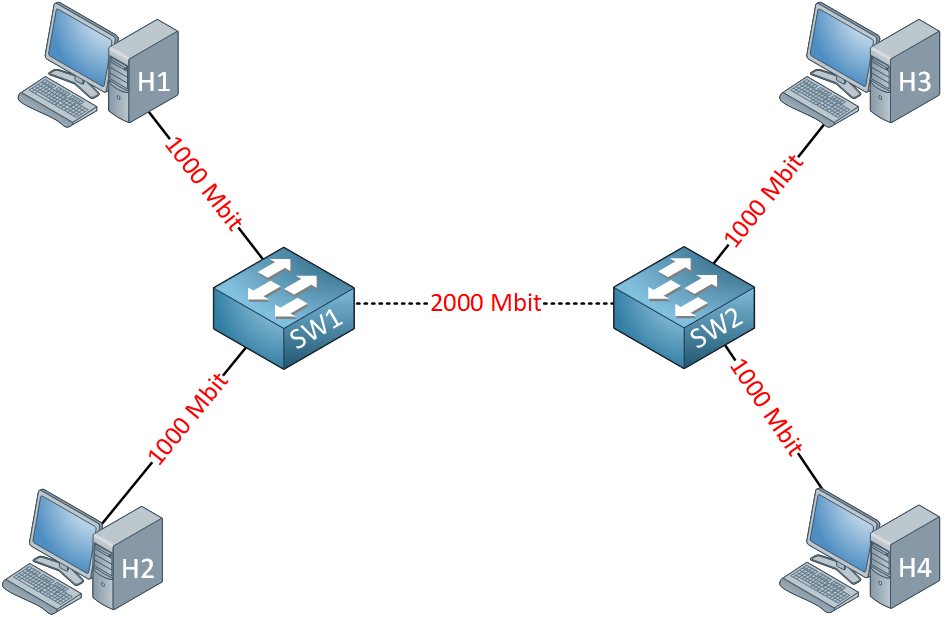
In the picture above, I have added a couple of extra links. The problem with this setup is that we have a loop between the switches, so spanning tree would block one out of two links. EtherChannel solves this problem because it creates a single virtual link out of these physical links:

Spanning tree sees this link as one logical link, so there are no loops! EtherChannel will do load balancing among the different links that we have, and it takes care of redundancy. Once one of the links fails, it will keep working and use the links that we have left.
Keep in mind that the physical links remain the limiting factor. A single traffic flow won’t be able to exceed > 1000 Mbit (single Gigabit link). An Etherchannel is the equivalent of adding more lanes to a highway. The bandwidth increases, but the speed limit doesn’t change.
You can assign up to 16 physical interfaces to an EtherChannel, but only eight interfaces will be active at a time.
If you want to configure an EtherChannel then we have three options:
PAgP and LACP are negotiation protocols that dynamically configure an Etherchannel. PAgP is a Cisco proprietary protocol so you can only use it between Cisco devices. LACP is an IEEE standard which many vendors support.
It’s also possible to configure a static EtherChannel without these protocols doing the negotiation of the link for you.
If you are going to create an EtherChannel you need to make sure that all interfaces have the same configuration:
PAgP and LACP will check if the configuration of the interfaces that you use is the same.
Let’s see if we can configure an Etherchannel. We’ll try all three options but start with PAgP.
If you want to configure PAgP there are two options you can choose from. The interface can be configured as:
Here’s a quick overview with the two PAgP configuration options and whether an EtherChannel will form or not:
| Desirable | Auto | |
| Desirable | Yes | Yes |
| Auto | Yes | No |
Let me show you an example of how to configure PAgP between two switches. I’ll use SW1 and SW2 for this demonstration:

SW1 and SW2 each have two Gigabit interfaces which we’ll bundle these into a single logical link.
Here are our options:
SW1(config)#interface GigabitEthernet 0/1 SW1(config-if)#channel-group 1 mode ? active Enable LACP unconditionally auto Enable PAgP only if a PAgP device is detected desirable Enable PAgP unconditionally on Enable EtherChannel only passive Enable LACP only if a LACP device is detectedWe use the channel-group command on the interface-level. You can pick any number you like, I’ll go for 1. We need to decide whether we use auto or desirable mode. I’ll configure SW1 to use desirable mode:
SW1(config)#interface range GigabitEthernet 0/1 - 2 SW1(config-if)#channel-group 1 mode desirableI configure SW1 for PAgP desirable mode. It will actively ask SW2 to become an EtherChannel this way. We can configure SW2 in either auto or desirable mode. I’ll use auto mode:
SW2(config)#interface range GigabitEthernet 0/1 - 2 SW2(config-if)#channel-group 1 mode auto With auto mode, SW2 will only respond to incoming PAgP requests. After a few seconds, you’ll see the following message on both switches:
SW1 %LINK-3-UPDOWN: Interface Port-channel1, changed state to upThe switch automatically creates a new port-channel interface:
SW1#show interfaces port-channel 1 Port-channel1 is up, line protocol is up (connected) Hardware is EtherChannel, address is fa16.3e15.5fb2 (bia fa16.3e15.5fb2) MTU 1500 bytes, BW 2000000 Kbit/sec, DLY 10 usec, reliability 255/255, txload 1/255, rxload 1/255 Encapsulation ARPA, loopback not set Keepalive set (10 sec) ARP type: ARPA, ARP Timeout 04:00:00 Last input 00:03:04, output never, output hang never Last clearing of "show interface" counters never Input queue: 0/2000/0/0 (size/max/drops/flushes); Total output drops: 0 Queueing strategy: fifo Output queue: 0/40 (size/max) 5 minute input rate 0 bits/sec, 0 packets/sec 5 minute output rate 0 bits/sec, 0 packets/sec 12 packets input, 973 bytes, 0 no buffer Received 0 broadcasts (0 multicasts) 0 runts, 0 giants, 0 throttles 0 input errors, 0 CRC, 0 frame, 0 overrun, 0 ignored 0 input packets with dribble condition detected 240 packets output, 17496 bytes, 0 underruns 0 output errors, 0 collisions, 0 interface resets 0 unknown protocol drops 0 babbles, 0 late collision, 0 deferred 0 lost carrier, 0 no carrier 0 output buffer failures, 0 output buffers swapped outAt the moment, there’s nothing configured under the port-channel interface:
SW1#show run interface Port-channel 1 interface Port-channel1 endOur two physical interfaces that belong to this EtherChannel only have the channel-group command:
SW1#show run interface GigabitEthernet 0/1 interface GigabitEthernet0/1 channel-group 1 mode desirable endSW1#show run interface GigabitEthernet 0/2 interface GigabitEthernet0/2 channel-group 1 mode desirable endIf you want to make any changes like configuring the EtherChannel as a trunk, you need to do this under the port-channel interface. For example:
SW1(config)#interface Port-channel 1 SW1(config-if)#switchport trunk encapsulation dot1q SW1(config-if)#switchport mode trunkWhen you do this, the switch automatically adds the commands to the physical interfaces as well:
SW1#show run interface GigabitEthernet 0/1 interface GigabitEthernet0/1 switchport trunk encapsulation dot1q switchport mode trunk channel-group 1 mode desirable endSW1#show run interface GigabitEthernet 0/2 interface GigabitEthernet0/2 switchport trunk encapsulation dot1q switchport mode trunk channel-group 1 mode desirable endYou shouldn’t make any changes to the physical interfaces that belong to the EtherChannel. Always use the port-channel interface.
Let’s continue and take a closer look at the status of the EtherChannel with some show commands. Here’s the first one:
SW1#show etherchannel summary Flags: D - down P - bundled in port-channel I - stand-alone s - suspended H - Hot-standby (LACP only) R - Layer3 S - Layer2 U - in use f - failed to allocate aggregator M - not in use, minimum links not met u - unsuitable for bundling w - waiting to be aggregated d - default port Number of channel-groups in use: 1 Number of aggregators: 1 Group Port-channel Protocol Ports ------+-------------+-----------+----------------------------------------------- 1 Po1(SU) PAgP Gi0/1(P) Gi0/2(P)The show etherchannel summary command gives a nice clean overview with all your EtherChannels. It tells us whether the EtherChannel is up and which protocol we use. Here’s another show command:
SW1#show etherchannel 1 port-channel Port-channels in the group: --------------------------- Port-channel: Po1 ------------ Age of the Port-channel = 0d:00h:10m:16s Logical slot/port = 2/1 Number of ports = 2 GC = 0x00010001 HotStandBy port = null Port state = Port-channel Ag-Inuse Protocol = PAgP Port security = Disabled Ports in the Port-channel: Index Load Port EC state No of bits ------+------+------+------------------+----------- 0 00 gi0/1 Desirable-Sl 0 0 00 gi0/2 Desirable-Sl 0 Time since last port bundled: 0d:00h:00m:07s Gi0/1 Time since last port Un-bundled: 0d:00h:04m:08s Gi0/2The show etherchannel command gives you an overview of our EtherChannel. You can see the protocol and interfaces we use, and it tells us whether the logical interface is up.
Here’s the last show command you can use:
SW1#show interfaces GigabitEthernet 0/1 etherchannel Port state = Up Mstr In-Bndl Channel group = 1 Mode = Desirable-Sl Gcchange = 0 Port-channel = Po1 GC = 0x00010001 Pseudo port-channel = Po1 Port index = 0 Load = 0x00 Protocol = PAgP Flags: S - Device is sending Slow hello. C - Device is in Consistent state. A - Device is in Auto mode. P - Device learns on physical port. d - PAgP is down. Timers: H - Hello timer is running. Q - Quit timer is running. S - Switching timer is running. I - Interface timer is running. Local information: Hello Partner PAgP Learning Group Port Flags State Timers Interval Count Priority Method Ifindex Gi0/1 SC U6/S7 H 30s 1 128 Any 5001 Partner's information: Partner Partner Partner Partner Group Port Name Device ID Port Age Flags Cap. Gi0/1 SW2 0019.569d.5700 Gi0/1 19s SAC 10001 Age of the port in the current state: 0d:00h:02m:37sThe third method to verify your EtherChannel is to use the show interfaces command. In my example, I am looking at the information of the GigabitEthernet 0/1 interface. Besides information on our local switch, you can also see the interface of our neighbor switch.
Want to take a look for yourself? Here you will find the final PAgP configuration of each device.
hostname SW1 ! interface GigabitEthernet0/1 switchport trunk encapsulation dot1q switchport mode trunk channel-group 1 mode desirable ! interface GigabitEthernet0/2 switchport trunk encapsulation dot1q switchport mode trunk channel-group 1 mode desirable ! interface port-channel 1 switchport trunk encapsulation dot1q switchport mode trunk ! endhostname SW2 ! interface GigabitEthernet0/1 channel-group 1 mode auto ! interface GigabitEthernet0/2 channel-group 1 mode auto ! interface port-channel 1 ! endLACP is similar to PAgP but uses different terminology:
At least one switch should use active mode. When both switches use passive mode, nothing will happen.
| Active | Passive | |
| Active | Yes | Yes |
| Passive | Yes | No |
I’ll use the same topology we used for PAgP:

We’ll configure SW1 to use active mode:
SW1(config-if)#interface range GigabitEthernet 0/1 - 2 SW1(config-if)#channel-group 1 mode active And SW2 will use passive mode:
SW2(config)#interface range GigabitEthernet 0/1 - 2 SW2(config-if)#channel-group 1 mode passiveLet’s verify our work. We can use the same show commands we use for PAgP:
SW1#show etherchannel summary Flags: D - down P - bundled in port-channel I - stand-alone s - suspended H - Hot-standby (LACP only) R - Layer3 S - Layer2 U - in use N - not in use, no aggregation f - failed to allocate aggregator M - not in use, minimum links not met m - not in use, port not aggregated due to minimum links not met u - unsuitable for bundling w - waiting to be aggregated d - default port A - formed by Auto LAG Number of channel-groups in use: 1 Number of aggregators: 1 Group Port-channel Protocol Ports ------+-------------+-----------+----------------------------------------------- 1 Po1(SU) LACP Gi0/1(P) Gi0/2(P)Let’s try the show etherchannel command:
SW1#show etherchannel 1 port-channel Port-channels in the group: --------------------------- Port-channel: Po1 (Primary Aggregator) ------------ Age of the Port-channel = 0d:00h:01m:43s Logical slot/port = 16/0 Number of ports = 2 HotStandBy port = null Port state = Port-channel Ag-Inuse Protocol = LACP Port security = Disabled Load share deferral = Disabled Ports in the Port-channel: Index Load Port EC state No of bits ------+------+------+------------------+----------- 0 00 Gi0/1 Active 0 0 00 Gi0/2 Active 0 Time since last port bundled: 0d:00h:01m:04s Gi0/2And last but not least, let’s try show interfaces :
SW1#show interfaces GigabitEthernet 0/1 etherchannel Port state = Up Mstr Assoc In-Bndl Channel group = 1 Mode = Active Gcchange = - Port-channel = Po1 GC = - Pseudo port-channel = Po1 Port index = 0 Load = 0x00 Protocol = LACP Flags: S - Device is sending Slow LACPDUs F - Device is sending fast LACPDUs. A - Device is in active mode. P - Device is in passive mode. Local information: LACP port Admin Oper Port Port Port Flags State Priority Key Key Number State Gi0/1 SA bndl 32768 0x1 0x1 0x2 0x3D Partner's information: LACP port Admin Oper Port Port Port Flags Priority Dev ID Age key Key Number State Gi0/1 SP 32768 5e00.0001.8000 18s 0x0 0x1 0x2 0x3C Age of the port in the current state: 0d:00h:01m:37sAs you can see the protocol is now LACP, we have a Port-channel 1 interface with two member physical interfaces.
Want to take a look for yourself? Here you will find the final LACP configuration of each device.
hostname SW1 ! interface GigabitEthernet0/1 channel-group 1 mode active ! interface GigabitEthernet0/2 channel-group 1 mode active ! interface port-channel 1 ! endhostname SW2 ! interface GigabitEthernet0/1 channel-group 1 mode passive ! interface GigabitEthernet0/2 channel-group 1 mode passive ! interface port-channel 1 ! endInstead of PAgP or LACP, we can also manually enable the Etherchannel. I’ll use the same topology to demonstrate this:

Here’s the configuration:
SW1(config)#interface range GigabitEthernet 0/1 - 2 SW1(config-if-range)#channel-group 1 mode onSW2(config)#interface range GigabitEthernet 0/1 - 2 SW2(config-if-range)#channel-group 1 mode onThat’s all there is to it. Let’s try our show commands. We’ll start with an overview:
SW1#show etherchannel summary Flags: D - down P - bundled in port-channel I - stand-alone s - suspended H - Hot-standby (LACP only) R - Layer3 S - Layer2 U - in use N - not in use, no aggregation f - failed to allocate aggregator M - not in use, minimum links not met m - not in use, port not aggregated due to minimum links not met u - unsuitable for bundling w - waiting to be aggregated d - default port A - formed by Auto LAG Number of channel-groups in use: 1 Number of aggregators: 1 Group Port-channel Protocol Ports ------+-------------+-----------+----------------------------------------------- 1 Po1(SU) - Gi0/1(P) Gi0/2(P)In the output above, you can see we don’t use any protocol. Let’s take a closer look at the Port-channel interface:
SW1#show etherchannel 1 port-channel Port-channels in the group: --------------------------- Port-channel: Po1 ------------ Age of the Port-channel = 0d:00h:06m:54s Logical slot/port = 16/0 Number of ports = 2 GC = 0x00000000 HotStandBy port = null Port state = Port-channel Ag-Inuse Protocol = - Port security = Disabled Load share deferral = Disabled Ports in the Port-channel: Index Load Port EC state No of bits ------+------+------+------------------+----------- 0 00 Gi0/1 On 0 0 00 Gi0/2 On 0 Time since last port bundled: 0d:00h:01m:21s Gi0/2 Time since last port Un-bundled: 0d:00h:04m:05s Gi0/2And we can check one of the two physical interfaces and see the Etherchannel information:
SW1#show interfaces GigabitEthernet 0/1 etherchannel Port state = Up Mstr In-Bndl Channel group = 1 Mode = On Gcchange = - Port-channel = Po1 GC = - Pseudo port-channel = Po1 Port index = 0 Load = 0x00 Protocol = - Age of the port in the current state: 0d:00h:01m:41sThat’s all we have.
Want to take a look for yourself? Here you will find the final manual configuration of each device.
hostname SW1 ! interface GigabitEthernet0/1 channel-group 1 mode on ! interface GigabitEthernet0/2 channel-group 1 mode on ! interface port-channel 1 ! endhostname SW2 ! interface GigabitEthernet0/1 channel-group 1 mode on ! interface GigabitEthernet0/2 channel-group 1 mode on ! interface port-channel 1 ! endThe last thing I want to show you about EtherChannel is load-balancing. Take a look at the following output:
SW1#show EtherChannel load-balance EtherChannel Load-Balancing Configuration: src-mac EtherChannel Load-Balancing Addresses Used Per-Protocol: Non-IP: Source MAC address IPv4: Source MAC address IPv6: Source MAC addressUse the show etherchannel load-balance command to see what the default configuration is. As you can see, this switch load balances based on the source MAC address. If you want, you can change this behavior with the port-channel load-balance command:
SW1(config)#port-channel load-balance ? dst-ip Dst IP Addr dst-mac Dst Mac Addr src-dst-ip Src XOR Dst IP Addr src-dst-mac Src XOR Dst Mac Addr src-ip Src IP Addr src-mac Src Mac AddrThere are plenty of options to choose from, including combinations of source and/or destination MAC or IP addresses.
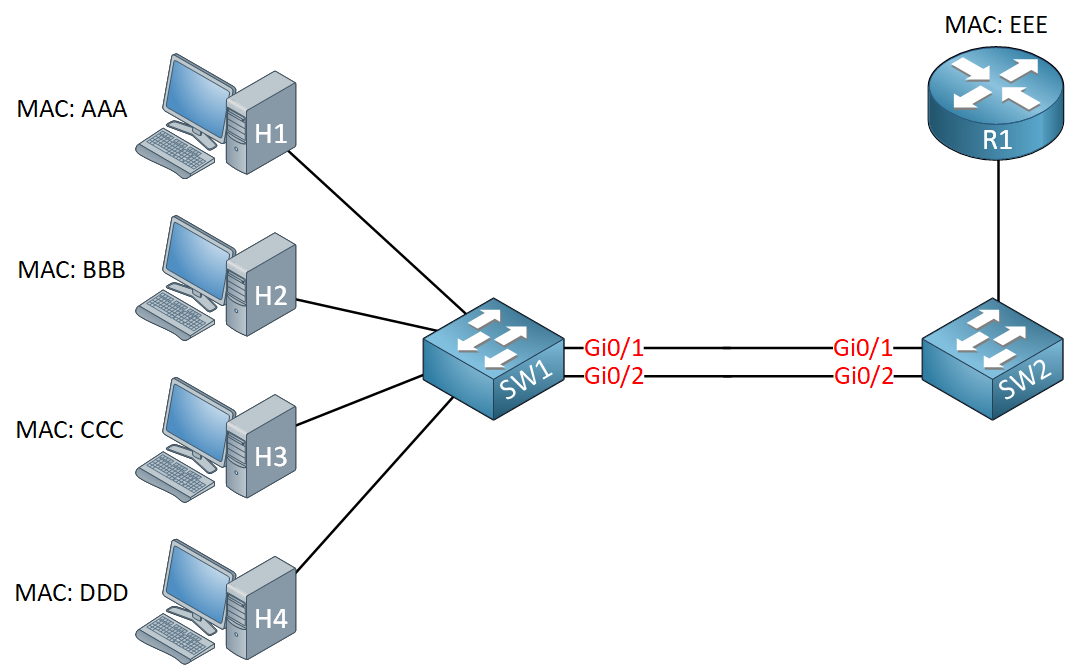
Why should you care about load balancing? Take a look at the picture below:

We have SW1 and four computers. On the right side, we have SW2 and a router. The default load-balancing mechanism is the source MAC address. This means that ALL traffic from one MAC address will be sent down one and the same physical interface, for example:
Since we have multiple computers, this is fine. Both physical links on SW1 will be used for our EtherChannel, so depending on how much traffic the computers send, it will be close to a 1:1 ratio.
It’s a different story for SW2 since we only have one router with MAC address EEE. It will pick one of the physical interfaces so ALL traffic from the router will be sent down interface GigabitEthernet 0/1 or 0/2. One of the physical links won’t be used at all.
If this is the case, it might be better to change your load-balancing algorithm. For example, on SW2, we could do this:
SW2(config)#port-channel load-balance dst-macIf we switch the load balancing to destination MAC address on SW2 then traffic from our router to the computers will be load-balanced amongst the different physical interfaces because we have multiple computers with different destination MAC addresses.
Want to take a look for yourself? Here you will find the final load-balancing configuration of each device.
hostname SW1 ! interface GigabitEthernet0/1 channel-group 1 mode active ! interface GigabitEthernet0/2 channel-group 1 mode active ! interface port-channel 1 switchport trunk encapsulation dot1q switchport mode trunk ! endhostname SW2 ! interface GigabitEthernet0/1 channel-group 1 mode passive ! interface GigabitEthernet0/2 channel-group 1 mode passive ! interface port-channel 1 switchport trunk encapsulation dot1q switchport mode trunk ! port-channel load-balance dst-mac ! endThat’s all I have on EtherChannels for now; hopefully, this has been helpful to you! If you have any questions feel free to leave a comment.
You have now learned what EtherChannels are and how to configure them:
I hope you enjoyed this lesson. If you have any questions, please leave a comment.